March 04, 2008
Birth of BMPToBDF (bmp2bdf) Tool
 Introduction to the BMPToBDF tool. This is a command line tool (useful for calling from command prompt or from makefile), a windows application, and a DLL that you can incorporate into your project for conversion of BMP into BDF.
BMP is a windows bitmap, you can find these all over the place. BDF is a bitmapped font file format, commonly used in UNIX/LINUX XWindows, but also used in the Rockbox environment. Scalable fonts logic occupies a lot of space and processing, so bitmapped fonts are common in the world of embedded devices. Maybe you have some other use for BDF and for this tool.
Rockbox is an open source firmware software replacement to many common MP3 players out on the market. Firmware is the software that runs on these devices to show you menus, allow you to interact by play/pause/next/back/etc. Usually these hardware manufacturers have a closed end system; that is, they do not allow you to run your own software on their platforms.
Chumby is an example of those who allow you to build your own software for the platform. In the closed case, people take it upon themselves to reverse engineer devices and provide for alternate or enhanced functionality to those devices. Rockbox does for MP3 players, CHDK does for some Canon digital camera, and there's more if you search around the web for open source firmware.
Back to what we have at hand. I am playing around with the Rockbox SDK and found a need for a font that was lacking from the fonts package that they distribute. Basically, needed a small font since my Sansa c250 screen is small with hangul and jamo characters. In the build process they change BDF files into another font format. This meant I needed a BDF input for processing the font I wanted to see on my Rockbox build. This tool allowed me to create that font with MS Paint and generate a BDF which finally generated the font that goes on my Sansa c250. Yea, I know I generally spread interest from thing to thing in a fairly rapid fire. Eventually some pieces may tie together!
More info after the link.
The usage instructions for the windows application follow below. The command line application acts in much the same manner and you can download the package to see the instructions for its usage.
Since there are two executables there are two separate ways to describe ultimate usage, however they share a common theme by achieving the same functionality and this section aims to cover that. For specifics on either the windows application or the windows console application, see the relevant section below.
The input BMP is a Windows BMP format. For this version it must be a monochrome 1 bit per pixel paletted bitmap. It must have the relevant and true bitmap header information, a color palette containing at least one black entry, and the pixel bits.
Within the pixel bits, are the pixels that make up glyphs. Within a single glyph there are representations of the color black and non-black. There is no distinguishing between non-black pixels, they are all treated as data that is not to be drawn. Black pixels indicate a point in the glyph that is to be drawn.
The glyphs are all arranged with a spacing between them of non-black pixels and occupy only one row. They must be adjacent and the value of the next glyph must be the value of the previous glyph plus one. That is, you would arrange the character A to the left of the character B with some spacing between the end of the A and beginning of the B.
To create this bitmap, you can use your favorite image editor. From MS Paint (free in windows) to more elaborate tools such as Adobe Photoshop, just ensure you're working with monochrome or 1bpp data. A visible representation of what the bitmap should look like is given as an ascii representation below. It makes sense only when viewed in a fixed width font. A # represents a filled pixel and a blank
space represents a non-filled space. Above the pixels is a ruler guide and must not be used in your actual bitmap. It is for simple counting of columns in this illustration.
0123456789012345
   ##   ######
  # #         #
    #         #
    #         #
    #    #####
    #   #
    #   #
 ######  ######
That's a two glyph bitmap pictured above. The value fed to the starting char would be Decimal 49 or the ascii representation of the character '1'. Other parameters are also required for describing your bitmap that don't fit well within the constraints of the bitmap that will be explained as follows.
It is much easier to describe with a picture. Let's take the letters A and g to illustrate the point. A # represents a filled pixel, or color of black in the input bitmap. A blank spot represents a blank or a non-black pixel on the bitmap.
              1 ----|    ----- 2
                    |    |
               ---------------------
               |    #              |------------------------------
               |   ###             |                              |
               |   # #       ### # |                              |
               |   #  #     #   ## |                              |
            3 -|  #   #    #     # |- 5                           |- 8
               |  #    #   #     # |                              |
               | #######   #     # |                              |
               | #      #  #     # |                              |
               | #      #   #   ## |                              |
               |#        #  #### # |------------------------------
               |                 # |--
               |                #  |  |- 6
             --|            ####   |--
             | ---------------------
      |-------  |        | |      |
      |          --------   ------
      4             |         |
                  width      width2
                  |               |
                   ---------------
                          |
                          7
1. # of leading blank spaces above drawing pixels (shown 0)
2. Spaces between glyphs. In this case if treated 1 or more this will be treated as 1 glyph since there is only 1 space. Realistically, you'd put 0 here.
3. # of leading blank spaces before drawing pixels of next glyph (shown 0)
4. # of trailing blank spaces after drawing pixels. Basically pad below character
before next line starts.
5. # of trailing blank spaces after drawing pixels before starting the next
character (shown 1)
6. Number of pixels to use for descent from the baseline, or characters that can
drop below the horizontal line of origin. (shown 3)
7. Whether to generate Fixed Width font. That is, if the characters do not occupy
the same width of a bounding rectangle, padding will be inserted so they do.
8. Ascent. This is calculated by the tallest character and the descent given. This
is not an input parameter to these programs.
wbmptobdf.exe
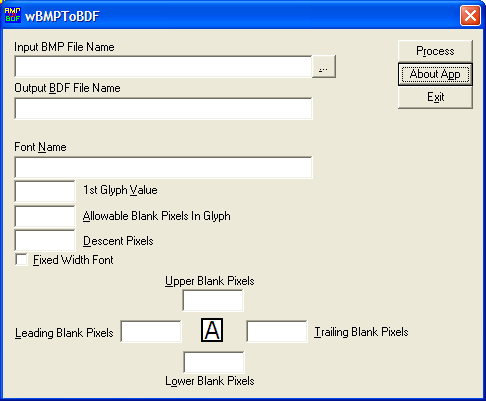
This is the windows tool to process a BMP to create a BDF file. The high level usage instructions are to open a compliant BMP File as described in the Usage section and fill in or select the options that you wish to be taken into the BDF File's logic and then click the process button.
The following are the entry fields and they are mapped to the entries as given by the description below the graphic of Ag in the Usage section.
Input BMP File Name[...]
You can type the path or click the "..." to browse to the path of the input BMP File Name.
Output BDF File Name
You can type the path and filename for the output BDF File. Or you can leave this blank and the path from the BMP File Name will be used as well as the base of the file name with the BDF replacing BMP.
Font Name
You can type the name that is set as the FONT parameter of the output BDF File.
1st Glyph Value
Corresponds to the 16 bit value of the first glyph in the bitmap. Can be entered as hexidecimal or decimal format.
Allowable Blank Pixels in Glyph
Corresponds to #2 in the description below Ag in the usage section.
Descent Pixels
Corresponds to #6 in the description below Ag in the usage section.
Fixed Width Font
When checked will generate a fixed width font, when not it will use the actual character spacing of the bitmap characters. Corresponds to #7 in the description below Ag in the usage section.
Upper Blank Pixels
Since the BMP file grabs the limits of each glyph, some padding may be desired. Setting this will put that number of padding pixels above a glyph in the BDF. Corresponds to #1 in the description below Ag in the usage section.
Leading Blank Pixels
Since the BMP file grabs the limits of each glyph, some padding may be desired. Setting this will put that number of padding pixels before a glyph in the BDF. Corresponds to #3 in the description below Ag in the usage section.
Trailing Blank Pixels
Since the BMP file grabs the limits of each glyph, some padding may be desired. Setting this will put that number of padding pixels after a glyph in the BDF. Corresponds to #5 in the description below Ag in the usage section.
Lower Blank Pixels
Since the BMP file grabs the limits of each glyph, some padding may be desired. Setting this will put that number of padding pixels below a glyph in the BDF. Corresponds to #4 in the description below Ag in the usage section.
Comments
Someone did this about 6 years ago:
http://hp.vector.co.jp/authors/VA013241/font/bmp2bdf.html